")
")
Displaying items by tag: crafts
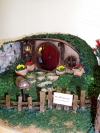
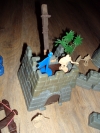
This is my first completed diorama. It is a model and draft for a real (hopefully) construction and its scale is 1m->5cm. The construction materials for the building and the ground are cardboard (mainly), clay, stucco and sifted soil. The grass was made in two ways: One was with finely cut, painted sponge (the yellow part of it) and the second was with painted (in various shades) sawdust. For the roof I used the green part of sponges (to give volume) and on top I glued the grass. At the edge of the diorama I have built a structure that looks like a well which will actually be something like a wood stove, and on top I have placed the solar oven.
The glues I used were PVA and hot silicone.
You can see the progress of the work (as well as the interior of the hobbit house) in the gallery photos.
Problems
The diorama was done at almost minimal cost (since it was originally intended to be used as a blueprint for something else). This means that I used whatever materials were available at the time. So in hindsight, I think the choice of cardboard was problematic as I mostly used cardboard pieces, which have a gap on the side (between their two sheets) which looks ugly.
Also, the roof does not rest at all on one of the door columns.
.jpg "Click to enlarge image hobbit (01).jpg")
.jpg "Click to enlarge image hobbit (02).jpg")
.jpg "Click to enlarge image hobbit (03).jpg")
.jpg "Click to enlarge image hobbit (04).jpg")
.jpg "Click to enlarge image hobbit (05).jpg")
.jpg "Click to enlarge image hobbit (06).jpg")
.jpg "Click to enlarge image hobbit (07).jpg")
.jpg "Click to enlarge image hobbit (08).jpg")
.jpg "Click to enlarge image hobbit (09).jpg")
.jpg "Click to enlarge image hobbit (10).jpg")
.jpg "Click to enlarge image hobbit (11).jpg")
.JPG "Click to enlarge image hobbit (12).JPG")
.JPG "Click to enlarge image hobbit (13).JPG")
.JPG "Click to enlarge image hobbit (14).JPG")
.jpg "Click to enlarge image stadia (0).jpg")
.JPG "Click to enlarge image stadia (01).JPG")
.JPG "Click to enlarge image stadia (02).JPG")
.JPG "Click to enlarge image stadia (03).JPG")
.JPG "Click to enlarge image stadia (04).JPG")
.JPG "Click to enlarge image stadia (05).JPG")
.JPG "Click to enlarge image stadia (06).JPG")
.JPG "Click to enlarge image stadia (07).JPG")
.JPG "Click to enlarge image stadia (08).JPG")
.JPG "Click to enlarge image stadia (09).JPG")
.JPG "Click to enlarge image stadia (10).JPG")
.JPG "Click to enlarge image stadia (11).JPG")
.JPG "Click to enlarge image stadia (12).JPG")
.JPG "Click to enlarge image stadia (13).JPG")
.JPG "Click to enlarge image stadia (14).JPG")
.JPG "Click to enlarge image stadia (15).JPG")
.JPG "Click to enlarge image stadia (16).JPG")
.JPG "Click to enlarge image stadia (17).JPG")
.JPG "Click to enlarge image stadia (18).JPG")
.JPG "Click to enlarge image stadia (19).JPG")
.JPG "Click to enlarge image stadia (20).JPG")
.JPG "Click to enlarge image stadia (21).JPG")
.JPG "Click to enlarge image stadia (22).JPG")
.JPG "Click to enlarge image stadia (23).JPG")


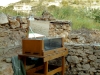
The solar oven is a construction that we completed with a friend in the summer of 2022. The initial idea came after a documentary about a group of people trying to live off grid in France and after a lot of searching (there are many types of solar ovens) we ended up with this particular design. The video we got the inspiration from and followed the steps is this: https://www.youtube.com/watch?v=mzoL-Rjjg6A
The inner chamber measures approximately 80 x 30cm and the overall dimension is approximately 1m x 40cm. The wood is plywood and the glass is fireproof. The insulation is 5cm and is made with stone wool. The black color is tempera.
At a later stage rubbers (flanges) were added internally, around the perimeter of the inner chamber for greater insulation and reflective metal surfaces on the vertical wooden walls, leaving only the base black.
The temperature inside the chamber of a solar oven naturally depends on how much it is exposed to the sun. Its performance is maximized if one can rotate it every now and then following the sun and of course if it is placed in a spot with many hours of sunshine. In my case, the oven is exposed to the sun until around 15.00 to 15.30 (which, especially in the summer, deprives me of several hours of operation). I have also not managed (due to other occupations) to operate it with frequent rotations. So the alternative is to have it placed where it gets the best temperatures at noon (12.00 to 14.00).
So these temperatures are around 120⁰C maximum inside the chamber, which translates to 140 to 150⁰C in the glass pyrex I cook in (it has reached 160⁰C on some summer days). This temperature (which the oven slowly reaches) is maintained from about 11.30 to 15.00 and then begins to drop slowly, maintaining a temperature of about 60-70⁰C until 18.00.
The solar oven has not yet been used on a daily basis. Despite this, it has cooked a variety of dishes, from vegetagles, chickpeas and beans to burgers with fries and cakes. It has also been used for drying carobs (for carob flour) and figs but also for heating already cooked foods.
The cooking process is very slow. I usually put the food in in the morning and take it out in the afternoon. Because the location I have placed it is not optimal, some foods that take a long time (especially legumes) do not always have time to soften completely.
Also, foods usually need a minimum of water because the ingredients release what they have inside them and this does not evaporate. Of course, this is also the reason why they come out juicy and do not burn easily, but on the other hand, it requires attention in preparation because the final dish may turn out to be soupy.
The weight of the solar oven is an issue. Due to its large size and materials (thick wood, glass) it is difficult to move or rotate. Also, its design is such that the entire upper part has to be lifted to get the food in or out, something quite difficult to use.
The large size may also create another problem. In combination with its irregular rotation, it does not have time to heat up evenly (in the corners when there is a shadow it has a different temperature than in the center).
As I already mentioned, in relation to the original design I have already added rubbers for better insulation and reflective metal surfaces for more light on the food. Other thoughts are of course placing it in a different spot where it will see more sun and maybe on a round structure where it can be rotated more easily. I'd like to try to build a solar tracker sometime in the future that will do this whole process automatically (and the hours I'm away) but maybe the heavy weight of the oven will make it challenging. Finally another idea so as to solve or avoid regular rotation, is to add side mirrors so that I direct the sun towards the chamber even at times (early morning, afternoon) that it is not aligned with the solar oven.


The game, although it maintains its popularity (especially in the ages over thirty and forty) has stopped being released - at least in Greece, although a new version has been released lately, but quite different. You can find it used and usually at quite a bargain price.
Our own game (mine and my brother's) had been abandoned for many years in some warehouse. This year I decided to fix it and see if it can be made functional again.
The main problems were that most weapons (crossbows and catapults) had all their moving parts missing or broken. For the repair I used bbq sticks (the ones with the rectangular handle at the end), rubber bands, metal clips (which I opened up to make the pivot shafts), paints and a dremmel for the small jobs (drilling, cutting, scraping).
The next plans are to make my own constructions.


Easy constructions with cardboard rolls to make with your child. I've seen most of them from websites and videos (there are tons of ideas out there if one is willing to look for them). The materials I used are toilet paper rolls, thick colored cardboard, eyelets for crafts, paints.
The small planes are about 5 to 7 cm in size. Here I used thin cardboard rolls, temperas, silicone glue, craft wood, bottle caps and for the helicopter some extra materials (plastic for the rear propeller, a metal base for the propeller and a piece of glass for the front).
From time to time we have made other crafts with our children but I couldn't find them (lost through time and changing houses).


Now in Bookstores
We Want Everything
the publications of colleagues, Nov. 2021
Summer of 1969, Italy. A year after May '68, FIAT workers began a dynamic and unmediated strike against their powerful boss. Their struggle marked the beginning of a decade of workers' and students' mobilizations and the rise of the Autonomy movement. It was characterized by many as the last invasion of the working class into the sky. Last ... let's hope until the next one ...